
What the heck is she up to, now? Shaving. That’s right; there are actually more options for shaving than four blades, or seven blades, or more blades than fingers on your hand. And there are shaving creams and soaps that don’t smell like a chemical concoction and last a lot longer than that canned foam.
So, what exactly does one use is one doesn’t use a cartridge razor? Well, what did they use before disposable razors?

Reintroducing: Double Edge Razors! They also come in single edge format, they have a handle and a head that comes in either one or two parts that open like a door, or pull apart and secure to the handle respectively. You pop a razor blade into the head and away you go!

The major difference between this one blade and the cartridges? $$$. They range from about 12¢ to the pricey 60¢ blades. Considering I was paying $20-25 bucks for 8 blades ($2.50 at it’s cheapest), even if I changed the blade every time I shaved my legs and underarms, that’s a considerable difference.
Another great reason I wanted to dip my feet into the vintage shaving pond was the skin benefits. No more razor burn, bumps, or redness. Even my first time with this incredibly sharp razor I only just nicked myself, which compared to when I’ve shaved off part of my ankle when I was learning as a teenager, I’ll take the little baby cut anyday. I’ve shaved with my kit three or four times now and it is, simply put, better. It’s ritualistic and relaxing; it’s not the fastest way to remove unwanted hair, but it’s certainly more pleasant. It’s like a spa treatment every time I shave.
On top of the price and the feeling and the pampering that comes with double edge (DE) shaving, it’s less wasteful. The only thing that gets a toss is a blade after every few shaves. I’m hoping to find a decent way on recycling them since they are made of metal, usually stainless steel. Plus, since I can change the blade without feeling like I’m wasting money or throwing something else away, I can get a closer shave.
On to my goodies! I first found out about this kind of shaving (and straight razor shaving) from Reddit. I stumbled upon Wicked_Edge, an amazing community of shavers, and tried to find a kit I could afford. Their FAQ has a great list of kits for any price range. I decided on a very highly spoken website, with superstar customer service: Maggard’s Razors. There I found a women’s starter kit where I could customize everything I wanted and ended up with this:
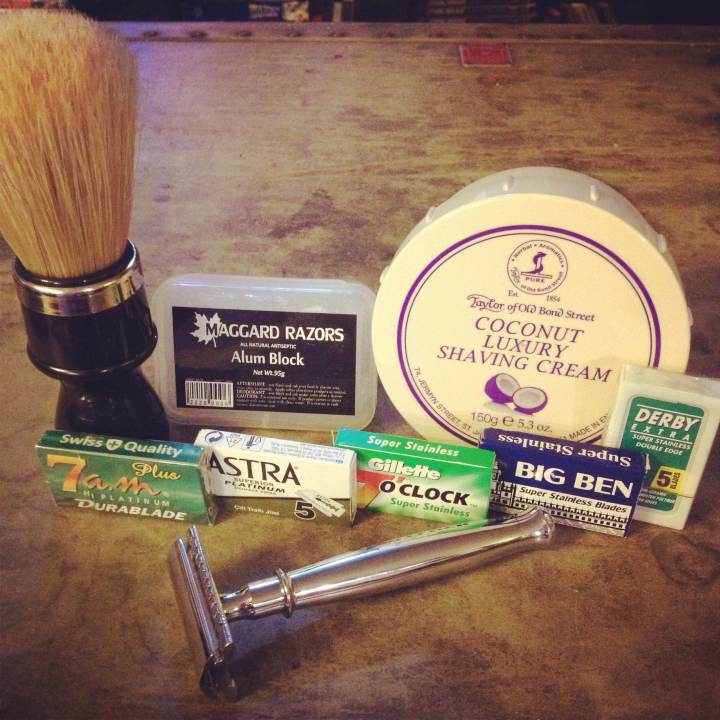
The whole kit cost under $60:
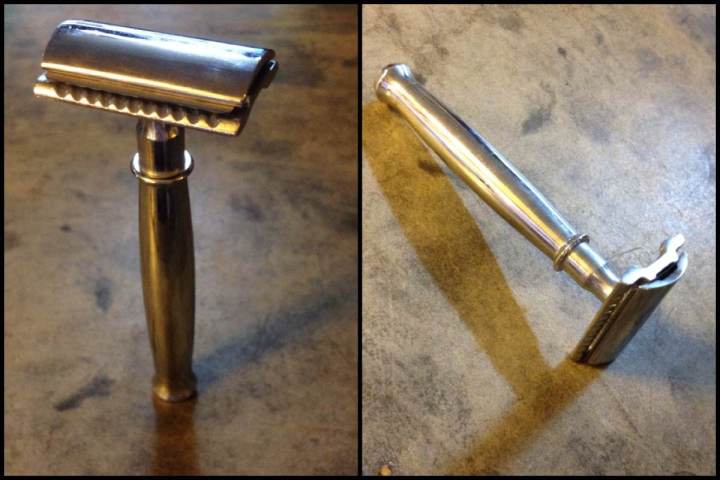
This is the Maggard Razor MR9 $16.

A sample pack of razors $5.25 or 21¢ per blade. And what surprised me was there is no “one amazing razor blade that everyone loves”. It’s totally personal. Everyone has a favorite that works amazing for them and works horribly for someone else. It’s nice to know there isn’t one . Each razor comes in a box of 5 and each blade is individually wrapped in paper. They also have these little numbers to help you remember how many shaves you’ve had on each one; you can see the 3 and 4 on the Derby Extra blade shown standing up in the head of my new razor.

I chose a cream brand, called Taylor of Old Bond Street, that I had heard good things about in coconut for $14. I chose a cream as opposed to a hard soap because they tend to be easier to learn with. Instead of pushing a button on a can, you use the cream/soaps, brush, and some elbow grease to generate a absolutely luscious lather, which is essential for not cutting yourself.

An Omega (10098) boar bristle brush $14. The main choices for brushes are animal or synthetic. Animal being mainly boar or badger (but can include horse among others). I chose the cheaper boar, which some shavers actually prefer. It has to soak before lathering and allegedly takes more to get a good lather, but I haven’t had any issues.
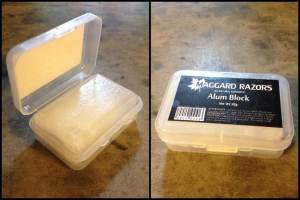
And an Alum Block $4. Alum acts as an antiseptic and an astringent agent to help the skin after shaving. It also helps close little nicks and cuts.

And not included in the kit, but a must have: bowls. I had a cappuccino mug and a camping bowl that both work nicely for making lather.

Here’s my kit in it’s new home! I got a cheap stand ($8) on amazon, and after realizing my brush was too tall I flipped the sucker over and figured out I could hang it from my shower shelves! My mug, cream, razor, and alum are right below my brush and nestled between my conditioner (apple cider vinegar) and shampoo (baking soda)–but that is an experiment in progress.
Now, how the heck do you shave with this kit! Well, in short: prep, lather, shave, aftershave.
1. Prep. I take a shower, which helps soften the hair and relax the skin. At the beginning, I empty my mug/bowl and start soaking my brush in warm water. I do my shower thing. You may have noticed I have a lot of soaps, but I actually use Dr. Bronners for cleaning my legs and underarms before shaving. It gets them a little cleaner, and I’ve read it’s suggested to use that or a glycerin based soap to prep.
2. Lather. Making a good lather is an art. I think I got a decent lather 3/4 times. I watched several YouTube tutorials on how to lather, and it comes down to experimentation. Each cream is different, and the same with soaps, so it takes practice to get it right. Here’s my videoed attempt. I start by soaking the brush, then removing excess water. I then grab an almond size (depending on how much lather you need), and working it in circles in the bowl. I’m making both clockwise and counter-clockwise circles and every once and a while, I “pump” the brush to help move the cream around. It’s mostly a “feeling it out” game for me. Much like a latte, big bubbles are bad; you want really tiny bubbles/foam. It should coat the bowl like you see near the end. And when you but it on it should leave a coating. If it dissipates during then you’ve gone to “wet” or added too much water, and a dry foam will be too creamy. In fact, his batch probably could have used a little more water and would have given me a little more. PS–my hand smells so good right now. PPS–You know you love the avocado colored sink.
You can also build lather on the face/leg/area you’re shaving or hand, but I prefer a bowl since I tend to be using a lot (two almond sized portions) to cover two coats for both legs and underarms.
3. Shave. There are lots of things important in this step, so one really should watch some videos of more experienced shavers. The main points being to not add any pressure and let the blade do the work, angle, and direction of hair growth. Pressure isn’t necessary with a sharp blade, and it can lead to razer bums, ingrown hairs, etc. Angle is a bit trickier with curves. You have to learn the right angle and how to adjust to get the cut just right. And as for hair growth, with a single blade, you have to take multiple passes but you get a superior shave. The first pass is usually with the grain, then cross grain, then against for the best shave, but I tend to do one major pass on my legs with the grain, then maybe a touch up pass going against the grain.
4. After shave. Anything after the shave is considered “aftershave” so, I use that alum block. You rub the wetted block on wet just shaved skin to help it seal any minor cuts and clean the skin. It leaves behind the alum then after 15 or so seconds you wash it off. I finish with my lotion and that’s that!
It’s not something I have to do every time I want to shave, because cartridges are simply faster and easier, but damn do my legs feel like two sticks of buttah when I do.


